The Digital Planner that Syncs with Apple & Google Calendars
Quick jump to:
Introduction
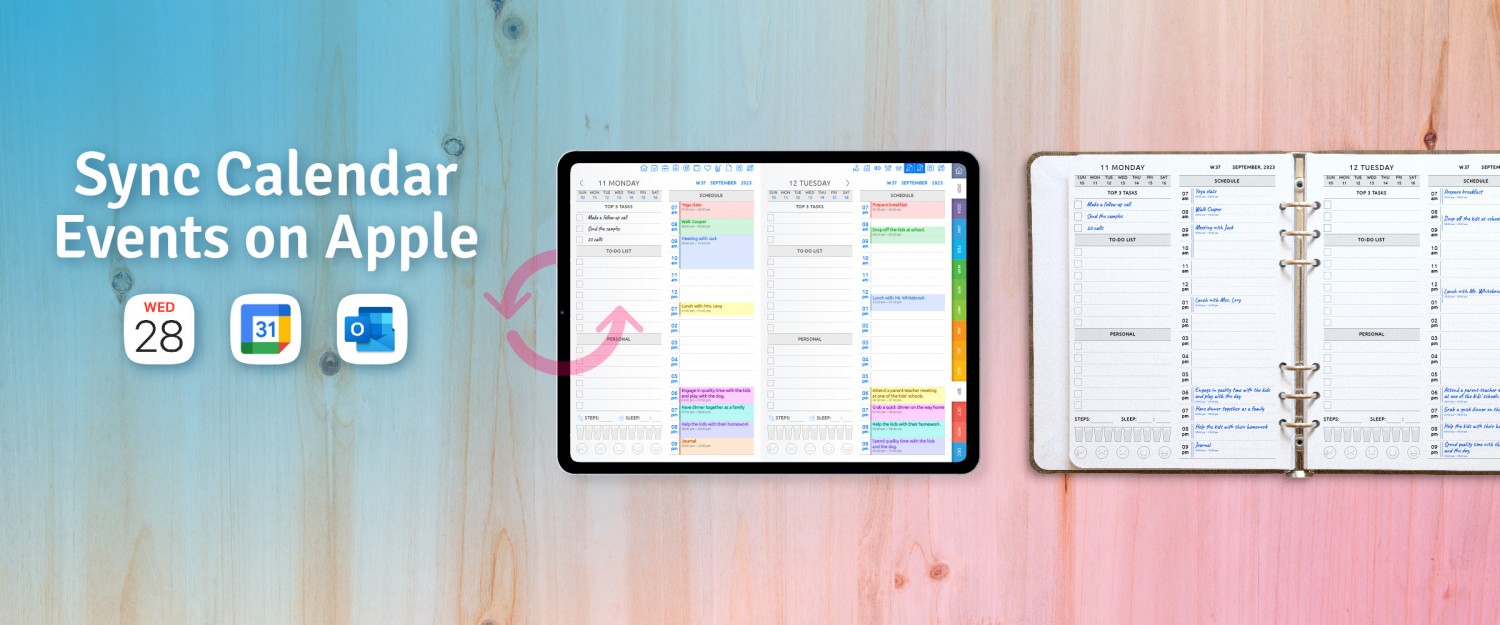
Welcome to a seamless synchronization experience between your Apple or Google Calendar and your Customizable Digital Planner on the iPad.
This guide will help you effortlessly integrate your digital planner with your calendar, allowing you to receive alerts about upcoming events.
Please make sure that your planner has the sync icons, represented by an Apple logo encircled with arrows, in your mothly or weekly layouts. If it doesn't, select "Apple calendar links" in "Planner Settings & Layouts" and download the planner.
Let's begin by installing the OnPlanners shortcut!
How to Install the Shortcut
For Apple Users:
- Go to Settings on your iPad.
- Navigate to Shortcuts.
- Enable Private Sharing (Note: You may disable this again after installation).
- Then click the image 👇 below to download the OnPlanners shortcut:
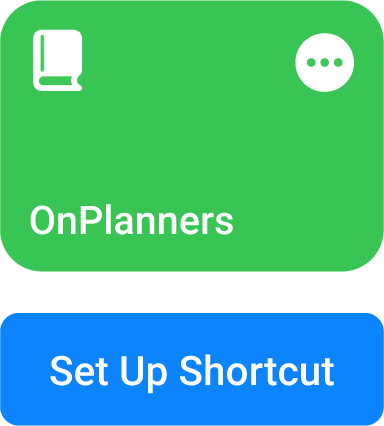
- Follow the prompts to confirm the installation.
That's it! Your planner sync icons are enabled.
How the Shortcut works
Synchronization Process: When you tap a sync icon on a planner page, it synchronizes the events for that page's layout period. For example, if it’s a weekly layout, it will sync the week's events.
Visualization: After syncing, an image with the events appears in your browser. You can then paste this image directly into your planner's weekly schedule.
Default Settings: The shortcut is set to work with GoodNotes for note-taking and Safari as the browser.
Please note that after a click on any external link, your device may give an alert "External Link
An external application must be launched to handle the link....Do you want to proceed? Yes or No".
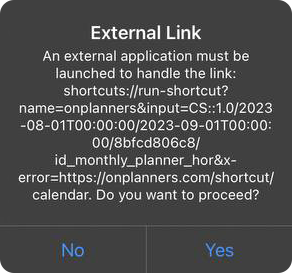
Click Yes every time.
All internal planner links work seamlessly.
Create Events
Quick Event Addition: To add an event, simply tap on the '+' sign in the time field of your daily, weekly, or monthly planner.
Drag and Drop: You can also drag event details directly from your planner into your calendar if it’s open alongside.
Setting Alerts: To set default event alerts, navigate to Settings > Calendar > Default Alert Times on your iOS device.
To learn more about setting default event alerts, please click on the Setup Alerts section.
Sync Events
Initiating Sync:
Find the sync icon, represented by an Apple logo encircled with arrows, on your digital planner. This icon is usually located either at the top or along the side of your planner's interface for easy access.
To begin synchronization, simply tap on this icon. The process is designed to be intuitive and user-friendly.
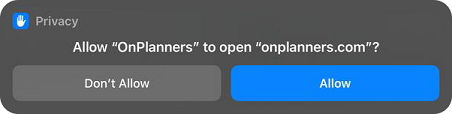
Permissions:
During the sync process, your iPad will request permission to send data to onplanners.com. This step is crucial for transferring the event details from your planner to the website. You'll also receive a prompt to allow the opening of onplanners.com.
For a seamless sync experience, it’s important to grant these permissions when prompted. This allows the shortcut to function correctly and ensures your data is handled securely.
By selecting 'Always Allow', you grant the shortcut ongoing permission to access and process your planner's data. This ensures consistent functionality and efficiency in the synchronization process each time you use it.

Click Allow when iPad asks to allow OnPlanners to open onplanners.com.
Post-Sync Visualization:
Once the synchronization is complete, an image displaying the events will appear in your browser. This image is designed for effortless integration, allowing you to easily copy and paste it directly into your planner layout.
Privacy Assurance:
We prioritize your privacy and data security. The transmission to onplanners.com is encrypted, and the data is only used for the purpose of syncing your planner events.
By following these steps, you can effectively synchronize your planner events, ensuring that your digital planner is always up-to-date with your latest schedule. This feature is designed to enhance your planning experience, merging the convenience of digital planning with the power of real-time synchronization.
Google Calendar Links
For iOS/Apple Google Calendar Users:
Linking the Calendars: To enable synchronization, link your Google Calendar with your Apple Calendar. The Google Calendar linking manual, provides detailed instructions for this process.
Downloading the Planner: Visit the “Planner Settings & Layouts” section on the planner page. Select “Apple calendar links” and then download your planner with these settings integrated.
For Android Google Calendar Users:
Accessing Calendar Links: Android users can open their Google Calendar by tapping the calendar icon on a specific date within the planner. Note that this function is for accessing the calendar only; it does not support synchronization of events.
Downloading the Planner: In the “Planner Settings & Layouts” section on our website, choose “Google Calendar links.” Download your planner from here to have these preferences applied.
Disable Apple/Google Calendar links
If you prefer not to sync events, simply select “None” in the Calendar Links menu under “Planner Settings & Layouts” and download your planner without calendar links.
Setup Alerts
We recommend setting a default event notification in your iOS settings for ease and efficiency.
Setting Default Notifications for Timed Events
Open Settings: On your iOS device, go to the ‘Settings’ app.
Navigate to Calendar Settings:
Scroll down and tap on ‘Calendar’.
Inside the Calendar settings, look for the ‘Default Alert Times’ option.
Set Default Alerts for Events:
Tap on ‘Events’ under ‘Default Alert Times’.
Choose your preferred default alert time for events. Options typically include times like ‘At time of event’, ‘5 minutes before’, ‘15 minutes before’, etc.
Selecting one of these options will set it as the default notification time for all new events that you create.
Setting Default Notifications for All-Day Events
Repeat the First Two Steps:
Open the ‘Settings’ app.
Go to ‘Calendar’ and then ‘Default Alert Times’.
Set Default Alerts for All-Day Events:
Tap on ‘All-Day Events’.
Here, you can select the default alert time for all-day events. These alerts are typically set for a day before the event, like ‘On the day of the event (9:00 AM)’, ‘1 day before (9:00 AM)’, etc.
Choose the option that best suits your needs.
How to Sync with Outlook?
Link your Outlook to Apple Calendar (refer to the manual for guidance), then choose "Apple calendar links" in your planner settings and download the planner.
How to Update / Delete the Shortcut?
To update, first delete the current OnPlanners shortcut from the Shortcuts App, then download the new version.
Long-term planners (5 years)
If you prefer simple and efficient long-term planning, the Digital Monthly Calendar (5 years) is a perfect pick. It offers calendars, and quarterly and monthly planners for each of the five years. You can customize the planner by selecting templates that align with your lifestyle. It includes key information templates and 30 note templates for your convenience.
Conclusion
Your feedback is invaluable in creating the world’s best digital planners. If you have suggestions or feature requests, please reach out to us.
Happy planning!
Add new comment